

BOOST MOOSE ORIGIN STORY
Spring 2010
It all started off by me looking for a set of 2.5 ton Rockwells for a 77 F250 I had as my current rig. Through a bit of searching I stumbled across a deal I couldn't turn down, I found it on Pirate4x4 and it was basically the truck I wanted to build for a fraction of the cost.
It was down in Idaho so a buddy and I made a road trip and brought it home.
Here we are in Montana.

Here it is the day I got it home.

So minty and fresh (that won't last ;)

Original Specs:
- 383 BB stroker with intake, headers, truck avenger carb, HD alt.
- TF 727 stock with deep pan.
- 203/ 205 doubler.
- 2.5ton rockwells, locker in front spool in rear mowhawked pans, wheel brakes on all 4 corners.
- 53" michelin tires, Double internal beadlock wheels.
- Linked suspension with 4, 16" sway-a-way schocks.
- Full roll cage.
- Full hydraulic steering with PSC pump.
- Dual flex a lite elec fans.
- 130L aftermarket fuel tank.
- Mastercraft bucket seats, 5 point harness.
- Full set of auto meter gauges.
Overall, the truck worked well and I ran it pretty much the way it was for a couple years.

The engine had lots of power but had also had some downfalls. It was time to go on the hunt for a new engine.
2013
Cummins Engine Install
There was a farmer in the area I work in that had a 96 CTD that was written off after being T-boned just behind the cab.
The truck had 280,000Km and the fella had the oil sampled regularly, right from when he got it. Needless to say, it was mint. I picked up the truck for a good price and once I parted out everything, I got the engine almost for free.
The drivetrain was going to get a revamp too. I had an NV4500 from my tow rig, that had the famous 5th gear problem. Plus, I grabbed an NP205 from a local wrecker.
Now it was time to get to work. First off was to yank the V8. I managed to sell it to a guy who needed it for a shortbox 2WD project and then I sold the transmission and 203/205 to a buddy.


Next was to get the Cummins up on a stand and give it some love.

I needed to squeeze some extra HP out of it, but wanted to get it running and get a feel for the cummins before I started dumping any real cash on mods.
I did a little research and decided to go with 4K gov springs, ARP head studs for reliability, and all the "free" Cummins mods. I wasn't ever going to tow with it so I went with the Extreme side of my free mods. So, I ended up advancing my pump timing to 16 deg, removing the fuel plate and cranking the AF controller all the way rich.
Bye bye low RPM's and clean exhaust.


I had a used Centerforce clutch hanging around the shop so I decided to put it to use.

With the engine now together, it was time to move onto the NV4500 and 205. I got the 205 from a 1st Gen with a Getrag so it was pretty much a bolt on procedure. The only thing I had to do was cut down the OD of the collar that joined the trans and T-case so it it would fit inside the 4500 output seal. I also upgraded the 205 front yoke to a 1410.
The 4500 was having 5th gear problems and that was the reason I had it replaced. I wasn't too concerned with the 5th gear in this application so I simply glued it back on with some green lock tight, snugged the nut down and called it good!

Now it was mock up time. From wheeling with other cummins powered rigs in Canada's muskeg, I quickly realized that it was super critical to get this big heavy engine sunk back in the truck as far as I could to help keep my rig from acting like a lawn dart, in the soft terrain.
Once I got the engine in place, I found what seemed to be a "sweet spot" with the differences in drivetrain. I managed to get the engine back into the cab and still keep my front and rear driveshafts the same length.
Also, a couple other things worked out at this point, there was still room for the exhaust to clear the cab, I had lots of room for the rad and the front of the engine was inline with the front of my front axle.


Once I figured out where everything was going to fit, I got busy boxing the frame and building new motor mounts. The factory engine saddle was also removed.

Once I had all the welding done, I bolted the motor into place with a set of aftermarket urethane inserts.

Oh and the shop I use has a 3 ton electric overhead hoist, this makes things a lot more simple!

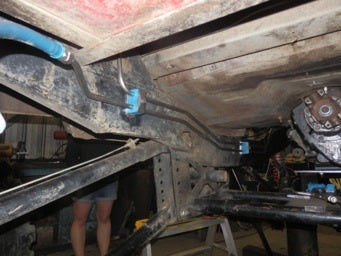
Hydraulics
Now that the motor was in place, it was time to get started on all the "little" things.
I was running a full hydro system and had no need for vacuum so I decided to eliminate the factory Dodge PS/ vacuum assy and go with an industral style Vickers vein pump, this guy is rated at 6GPM and 2000psi

To mate the pump up to the timing cover, I stole this adaptor off a 5.9 school bus engine.

The pump was pretty much a bolt up deal. I did have to grind a little off the injection pump mounting bracket to clear the one fitting.


I also built a small support bracket for the back of the pump.


I wanted to make sure I had a large reservoir, this would help prevent foaming and act as a cooler. The tank was designed to fit right next to the rad on the drivers side.


Fuel Lines
While we were in plumbing mode, I got my lovely girlfriend to redo the fuel lines on the truck. The line that was in there from the 383 was in pretty rough shape.
Now with the diesel, I needed a feed and return line. Allie spent some time working at a hydraulic shop and was really good with this sort of thing. I basically handed her all the parts and let her go to town!
First thing was to eliminate the stupid draw straw from the tank. I instead went with an aluminum sump from XPD for the feed from the tank.
Allie cutting the hole for the sump.

Installed

Allie then got working on the fuel lines. She used 1/2 stainless steel with swagelock fittings and push on hose for a little flex.
The tube on the frame is made of 2 lengths of 1/2 tube and none was wasted. Quite impressive!

Return line was wedged down to 3/8 then ran back into the original draw tube.


She's cute and good with a set of tube benders! What more could a guy want?
Electrical
Next on the list was electrical. This is another thing that needs very special attention when wheeling in the great white north as there are lots of nasty things that electrical don't like. LOTS of Mud, muskeg, water, snow/ cold, dirt/ dust, oh and lots of mud, did I mention mud?
I have done a fair bit of electrical wiring so I felt pretty comfortable building my own harness, especially considering I was wiring up an engine that could start and run with one wire! This way I can address any points of trouble from the factory.
Obviously, there were a few more things that needed more than 1 wire. I have a Racepack UDX that I use on my sled in the winter, it's a pretty expensive piece of equipment so I figured it would be nice to use it year round. Some of the benefits it has over normal gauges is it's super tough (water proof, cold and dirt proof), it has a recording function that monitors and keeps track of all readouts, it records min and max and even has 10min of playback. The sensors that are available for it are almost unlimited, pressure/ temp sensors of all different ranges, they even sell sensors that can record shock travel and ones that are an infrared. Just point them at whatever you like and monitor/record temp inside the cab.
I did run a normal oil pressure and volt gauge just incase the Racepack did crap out.

I also needed to get some sort of tach signal for the Racepack. It wasn't critical to have a tach on the diesel as they do have a governor but it would be nice to have some sort of reference. I went the cheap route and had a local shop hook up a signal wire to my alt. While they had it I got them to install an internal regulator to replace the Dodge ECM/BCM. Easy, breezy, beautiful!

The full list of options I went with on the Racepack:
- Tach
- Boost press
- EGT
- Volt
- Fuel level
- Water temp.
The Racepack can be calibrated by hooking it up to a laptop. Using the laptop calibration is how I got my tack in sync. The alt spun at a different speed than the engine, so I used the photo tach for reference then tuned the Racepack to make the 2 numbers match.

I also used a full set of carling switches for all my components. They are weather proof and also very good looking!
All my wiring ran into a waterproof composite box, I mounted it in the cab and installed all my relays and fuses inside of it. I made as many ground and power connections inside as I could. Wiring was cut down to a bare minimum. Just enough to run the engine and a few accessories.


Wiring extravaganza

Finishing Touches
Intake and Exhaust Set Up and More
A few more smaller things needed to be finished off.
Such as, the dog house for the back of the engine

Turbo to intake pipe

The air filter was plumbed into the cab. The previous owner had the battery mounted in the old heater box area, however, I moved the batteries into the box and turned the old battery box into my air filter box.
Inside the cab

Intakes installed


All I had left was the exhaust and crossmember. At this point I was in panic mode, as we were a only a few days away from a 2 week long camping/ wheeling trip. So, I ended up fast tacking a couple things that could be re done at later date.
The crossmember was built from 1.5 x .250 DOM. Originally, I wanted to make it removable but in order to save time I just welded it on. I tied it into the shock hoop mounts which also happened to be the same spot in where the motor mounts sat.

The exhaust was another thing that got a little fast tracked, due to all the parts I needed not arriving on time. So, I ended up retrofitting the stock down pipe, welding on a 4" adaptor and letting a large piece of flex pipe finish the job. Practical but UGLY!


September 2013
I got her fired up and found a couple problems.
First, the hydraulic steering pump was spinning the wrong direction (this was my fault for ordering a pump with the wrong rotation). I tore the pump down and flipped the internal cartridge in order to get the pump working properly.
Second was the turbo waste gate was toast, causing the turbo to spool to unholy amounts of boost pressure (this is also sort of my fault as the problem wouldn't be near this bad if I wasn't feeding the engine so much fuel). Changed the waste gate and she was good to go!
We loaded it on the trailer and headed out to the Canadian northwest for 2 weeks in the bush, miles from any town (or cell service).
Here are a few photos from our trip and the first real test with the new motor.

Hauling back a weeks worth of fire wood.


Found a big rock aaand I had to drive on it!

Allie enjoying the ride.

Everything worked great with the engine, only trouble the whole trip was one tire dry rotted and came apart 30Km from camp (at least it happened on the last day). I had to limp it quite a ways on the bad tire to make it to a road where would could stop to pick it up on our way home the next day.

Anyone have a patch kit?

The ride out was fairly interesting, the whole day it was just my parents on their Polaris X2 (2 up sportsman), Allie and I. By the time we got my dilapidated truck to a spot, it could spend the night, it was getting dark and the quad was running low on fuel. We still had 15-20KM of trail back to camp, so we ended up dumping all my chainsaw gas into the quad and piling all 4 of us on it! Needless to say, we were all fairly relived to be back at camp. Fortunately, my family is used to unexpected days like this way out in the wilderness, they've actually come to call them "Neil adventures" haha!
Winter 2013
I drove the truck, for a couple seasons, just the way it was. Last fall, on a winter trip, I smoked the centerforce clutch and broke a rear shaft. Ended up coming out of the "hook" that trip.

I replaced the shaft and clutch the following spring. Doing the clutch was a little tough as all my trans jacks wouldn't go quite high enough so I had to improvise.


I had a really good summer with it but a few improvements were still needed.
Fall 2014
There was an impending MOAB trip, I figured I better get after a few much needed upgrades.
First, there was the steering. The truck originally came with a tractor Ram/Draglink style set up but the problem was the lower links at full droop would contact the drag link causing all sorts of badness. Secondly, the ram was mounted to the diff with a 1” thick piece of bar, bent at a 90 degree angle and after years of abuse it was starting to crack.
Original set up

Crack is wack

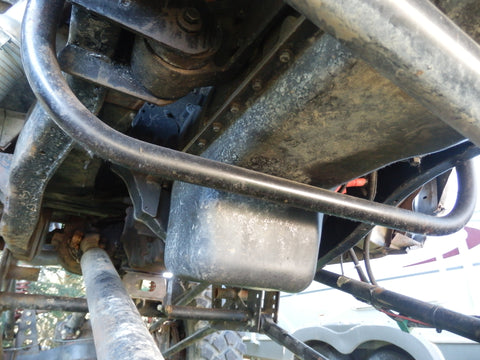
I had a PSC double ended ram I wanted to use, but the problem was getting a solid mount for the ram. Also, I wanted to mount the Ram behind the axle and install a pinion brake there as well.
First thing I did was build a template so I could properly fit my mounting plate.

At this point, I forgot to take photos. Here is the plate attached to the diff with the ram in place.


I wanted to eliminate the front wheel brakes as the calipers were mounted on the front of the knuckles and were constantly getting damaged by sticks.

Breaked a brake line

New pinion brake

At this point things got pretty tight. I had to spend quite a bit of time milling brackets just to keep the rotor from hitting on anything.
In the end it all fit but was pretty tight.


Next up was re-doing my ghetto fab exhaust.
I bought a V-clamp to 4” adaptor for my HX35.

Then welded a 4” 90 to a 45 for the down pipe
I don’t think it would pass ASA’s QC program but it will work

Splash of BBQ paint and she’s ready to bolt up.

The rest was just a chunk of 4” with a weld on tip, a short piece of flex, hangers and some clamps.


Had a few other small pre-MOAB things to finish up.
Wired up my winch to an in-cab switch and installed a small marine stereo with a couple of speakers.

Remote USB and AUX port for the head unit

I eliminated all the front wheel brakes. I know a guy who sells Rockwell parts local (great guy with awesome prices!), so I just got some new hubs and knuckles to replace the old parts.

Allie installed a cooler, to help with the hydraulic system in the MOAB heat and scrapped my crappy stock winch roller and replaced it with a Warn industrial fairlead. By the way, if you haven’t looked into Warns line of industrial rollers I would recommend it, they are BEEFY!
Old roller

New roller and cooler

Installed some rear limit straps in the center of the axle, hoping this would help it from jacking while on the steep stuff.
Had to do the flex test and make sure the straps weren’t limiting any wheel travel.

Yep, it's good!

Before MOAB we had a good test run out west on the September long weekend.
Rock crawling Alberta Style.

Found a couple dirt bikers who were trying to fight their way across a deep river. They were low on gas and didn’t have enough to back track the way they came. They were mighty grateful when I offered to take them and their bikes across the river in the back of my truck, especially seeing the road back to their camp was only a KM from the river crossing.

After that, it was load up and make the long drive to MOAB.

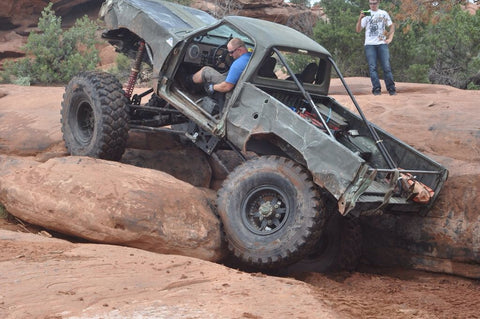
MOAB was a lot of fun and definitely something new compared to the trees and mud in Canada. The Dodge was a bit oversized for a few of the trails with wide track width and tall center of gravity. Overall, it worked quite well in the rocks.

Nov 2014
This was a pretty eventfull trip I had to share.
Every year we do a weekend trip for my GF Allie, we round up a few rigs and head into my buddy's hunting camp, set up deep in the Alberta foothills and spend the weekend. Every year the weather seems to get nasty that turns the whole trip into quite the adventure. This year did not disappoint!
First problem was Friday night on the way in, my truck sprung a fuel leak. I didn't have much fuel to begin with so by the time we found it my truck was pretty much bone dry. We ended up pouring 4liters of ATF, 4L 0w40 and 4L hydraulic oil into the fuel tank. This got me into camp so we could unload our gear and get set up.
There was another group heading into camp a few hours behind us, after getting into camp we got word that they had one rig broken down not far from the trailers. Problem was now they didn't have enough room to fit everyone and the rest of the gear. I decided to take my truck back (because I needed some diesel and there was a slip tank back at the trailers) so I headed out alone, with my almost empty tank of misc petroleum products, to see how far I could make it. If I ran out before I got back my buddy, Hippie, would just run me out a jerry can of diesel. Needless to say I made all of 300ft feet from the trailers before my truck chugged and ran out of fuel, I couldn't have been happier.
I fuelled up and went to take a load of gear and people back to camp that night. Hippie and my buddy, with the broken rig, decided to spend the night at the trailers and try to get the broken rig running in the AM.
Next morning we got news that only one rig was coming into camp, as they had given up on the broken Comanche.
By Saturday afternoon we had everyone and their gear back at camp. We had a big fire, a hot supper and some cold drinks with good friends. The hunting camp even has a wood fired sauna so we took turns steaming off the days mud, dirt and cold. Life was grand!
Throughout the night the weather took a turn for the worst, the temp dropped rapidly and the sky dumped a pile of snow on us.
Here is a pic of my weekend home and kitchen Sunday morning


With the degraded trail conditions, we decided that it was going to take all day (possibly more) to get back to the trucks and trailers and we knew that we only had time to make one trip out. At this point we had my truck, Hippies jeep, a somewhat stock Grand Cherokee and a quad, that pretty much wouldn't run. With us only making one trip we had to fit 10 people’s gear all into 3 rigs!
Here is my truck loaded and ready for the trail


After getting everything loaded and camp cleaned up, we hit the trail about noon.

We realized quickly that the trail was worse than expected. We had a fair bit of a trouble with the stock Cherokee and had to do some fancy winching up a snotty hill.

We made it back to the trucks just as the sun was setting.

It was quite an adventure but pretty much expected when you do battle with Mother Nature at this time of year. Despite the tough times, everyone said they had fun and will be back next year. (Unless Allie just wants to go out for dinner and a movie for her next birthday, but I doubt it)
Jan 2015
Now this brings us up to 2015 season, the truck was working very well so we made sure to run the wheels off it that year, literally!
We started early with some late winter, early spring wheeling.


July 2015
Did a couple of group runs too. One was a trail ride called The Scorching Boar, which is basically a group run followed by a pig roast back at camp. I ended up losing a wheel center out of a back rim, fortunately, it happened just as I pulled onto a gravel road.

Also, started getting back into some mug bog races. I used to do the odd race back before I got the Dodge but kind of got out of it. A local track started a hill-n-hole event so I figured I’d see how the old Dodge would fly!


Also, did another birthday trip for Allie, this year the weather co-operated and we had a nice, uneventful trip.


Near the end of the season, I did manage to break a 4340 front axle, it was the inner long side that let go. In the shafts defence it was mostly my fault. I had one tire buried in a deep trench and the other three on loose ground. After beating on it for a bit, the shaft let go unfortunately taking the locker with it.


My repair was a stock shaft and spool

2016
This brings things up to the 2015-2016 winter season. For a little back story, at this point I’ve had my side business, Western Canadian Rockwell, for about 1.5 years selling axles and parts here in Canada.
Shortly after bringing in a set of Meritor 611 axles, I was messing around in the shop and realized a 611 hub on a 2.5 ton axle would be a pretty easy axle set up. The main benefit to the bevel gear reduction hubs would be adding strength to everything inside the axle and the upstream rotating assembly.
After some design time, I came up with a knuckle that would accept the Meritor hub and bolt right onto the 2.5 ton housing. This would be ideal as it would also replace the stock cast knuckle that has a reputation for cracking.
I enlisted my buddy Gary’s help, who owns Freestyle projects, for the welding. I did the machine work and the rest was all laser cut. Here is the first set we put together. They worked well and Gary is an exceptional welder so everything turned out nice.

Here is some of my machine work on the king pin caps.


Here is the kit installed on the front of my truck. Everything bolted up perfectly, I had a set of aluminum 20x10” rims that would work with the Meritor wheel bolt pattern and my Michelin tires.
Everything worked great. The hubs are a 2:1 reduction so to compensate for the extra reduction, I basically switched my 205 (that I already left in low range) into high. This brought my overall reduction back to where I started.
If anyone is wondering the little tubes sticking out of the hub are for central tire inflation.

So, with the completion of the Front Hybrid Kit, it was time to move onto the rear of the truck. I had considered taking the easy route and going rear steer, however, there were a bunch of people interested in a rear axle Hybrid Kit so I got to work.
To start off I had a big flange that would align onto the stock 2.5 ton spindle. The plan was to weld it on then cut off the rest of the spindle that was sticking out past the flange.
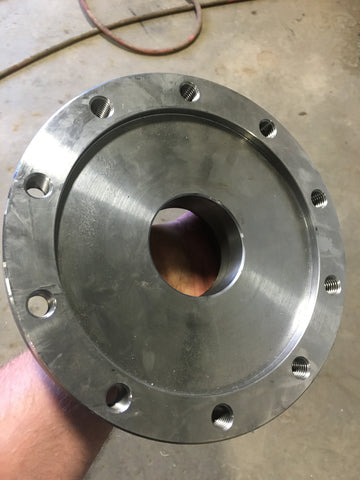


Worked perfectly. Next I needed a custom axle shaft that would spline into the 2.5 ton center and the Meritor hub. I had a local machine shop build that for me and it worked perfectly. Everything bolted up and fit exactly the way I expected.


Summer 2016
Got the Hybrid Axle Kit installed and had a good full 2016 season with the truck. We attended many mud races and a few top truck style events. I did my very best to beat the crap out of the axle kit to see if there were any weak links. To this date, I have found nothing. The truck was run hard with a set of 57” Deep lug AG tires and my 53” Michelins. Here’s some photos and videos of the event we attended in 2016.
This is the local mud race known as the Rimbey Mud Bog. They had the typical races through the pit, along with a hill and hole event. They even set up to do tug-o-wars. As a publicity stunt I volunteered to take on a rock truck.

A buddy, with some long travel nitrogen shocks, also put on a good show at the same event.

This was a Big Trucks Gone Wild event in Saskatchewan. It was my first time attending one and it was lots of fun. All the same stuff, bounty hole, tug pad, endless nut pits. I enjoyed the tug pad as it was a good test for the old Dodge.


Here’s a good video of the tug-o-war with the big silver Dodge.
An awesome video from High Desert Top Truck Challenge in Winnnemucca NV